7/10/11

Fairy Garden Clips


I recently whipped up these cute hairclips based on some doodles which my Little Berry drew of our fairy garden (a large flower pot loaded with moss, feathery carrot tops, blossoms, rocks, found items,bird feathers, etc)
You can find the clips in my Etsy shop. What sorts of ways do you find to bring your children's artwork to life?


4/8/11

Beaufulah Giveaway


If you like my ridiculously cute reversible kids clothes, then you'll love this super easy-to-enter giveaway that Kitchenwitch is hosting this week: $20 worth of credit to my Etsy shop for one winner. That's a skirt or pair of shorts of your chosing! This giveaway is just in time for spring.
Hop over and enter!

3/22/11

Play with your food!


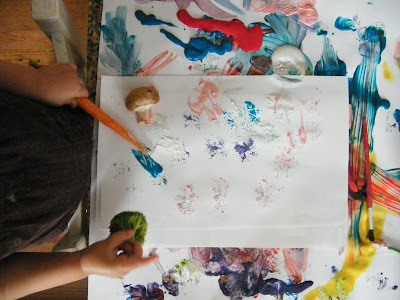
I know, it does seem contrary. But we've always allowed Little Berry to make her own food choices, and as an almost three year old, I can tell you it has payed off. If she's hungry, she tells us what she wants. If it's mealtime, we serve whatever we are having, and she eats what she wants, (and this girl EATS). So, today while I was cooking her some corn and prepping dinner, she was finger painting, I handed her a piece of corn cobb to play with and this is what she did with it.

It was genuinely one of the best times she's had in ages.


The mushroom was definitely her favorite, and the carrot she used like a pencil or to roll. I love the prints that resulted and would love to do something like a piece of paper pizza, print on tee shirts or cards for friends. They're fun and pretty, too.

It doesn't hurt that it kept her busy for a full thirty minutes while I prepped dinner, either :)


What veggies would your kids enjoy painting with?

*no vegetables were harmed in the making of this blog post. **by harmed I mean we didn't eat them after they were covered in paint.

3/20/11

little boxlings


So you've no doubt heard of the cuteness that is seed bombs, but this is for those of us with a wee bit more patience and some recycling on our hands. I find that these are a bit more gratifying to receive but much less inconspicuous to plant.

You will need:
plant seeds- I chose carrot, bell pepper and wildflower seeds.
a paper bag or newspaper or just old office paper for folding
Dirt, water& a sunny spot

I used a Trader Joe's paper bag because it was handy and because they say "recycle this bag!"

The bag will compost eventually when you drop your little seedling off in the wild wild world, or when you carefully transplant it into your garden space.

Step one: make a box. You will need a square of paper about 4.5x4.5inches.
It doesn't need to be perfect because you're just filling it with dirt :)


Fold your square in half each way, then unfold and fold in half the other way.

Repeat this diagonally. It will look like this:

Then, Fold the corners in to the center so they touch, unfold.

Fold the tips of the corners in this way:

and now fold each edge into itself and across diagonally:

unfold again, and then repeat all the way around of course.
Next, unfold completely, find a corner, point it away from you, and label it with what seeds you will be planting, like this:
(be as fancy as you like!)

Now fold two corners in towards the center,

Fold up their edges,

and then fold the ends up to close!

Finish the other side
(yay! a box!)
fill with dirt,sprinkle seeds in, water gently and set in a nice sunny spot until you're ready to drop it off somewhere lovely...and repeat!


These would make sweet gifts for your small friends, neighbors, or left in a pretty line at the park

3/15/11

Easy Peasy Kid-Friendly Marbling

One of my favorite things to do with little berry is get creative. From day-to-day this takes on different meanings, but today it was a simple water and coconut oil marbling craft.
I've done this before with baby oil but I don't own that anymore so coconut oil is what I used. You will need:
Paint (we used watercolors, which were very light and food coloring which gave darker colors but less variations)


*Oil (again, we used coconut oil which I melted to a liquid)
*a pan you don't mind getting oily (filled a third full of cool water)
*Paper scraps or pretty paper for making cards and tags
*a place to put your finished papers on to dry
*and of course, an energetic and joyful toddler.

To make pretty paper like ours, fill your pan a third full of cool water. Add a few drops of your oil and allow it to spread out and ball up across the water.


Then add about a teaspoon of different paints and shake the pan slightly so the oil separates and begins to roll through the paint across the pan.


Next, dip a piece of paper in the mixture and let it settle beneath the oil so the paint sticks around the spaces where the oil didn't hit, like this:


Then, lift, allow to drip a little, and place on a plate to dry.


VĂ³ila! You've made marbled paper.


Enjoy, and please make sure your whirlychild is wearing art project friendly clothes :)